[CubePilot] ЧШНКШЃХЉ ШїОю4 КЃРЬНК
Pixhawk Here4 Base
![[ЦгФмМЅ] [CubePilot] ЧШНКШЃХЉ ШїОю4 КЃРЬНК](/shop/data/goods/1710633639_l.jpg)
РЯЙнАЁАн : 200,000 (ШИПј АЁРдНУ УпАЁ ЧвРЮ)
РћИГБн : 2,000Пј
РћИГБн : 2,000Пј
ЙАЗљУЂАэ :
E
РчАэ :
ЙАЗљУЂАэ ЁФАГРжРН
ЛѓЧАЙјШЃ : QA84679 (ЁиРќШЙЎРЧНУ ЛѓЧАЙјШЃИІ ОЫЗССжММПф)

 Virtual Assistant
Email Us
ЛѓЧАЛѓМММГИэ
ЙЯРЛ Мі РжДТ ЦгФмМЅ, 6АЁСі ОШНЩ ОрМг
99.9% НЧРчАэ
22Гт РќЙЎАЁ
ШЎНЧЧб БтМњСіПј
УтАэ Рќ УдПЕ
НЧНУАЃ ЙшМлОЫИВ
Since 2004
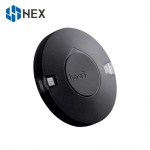
[CubePilot] Here4 Base
![[ЦгФмМЅ] [CubePilot] ЧШНКШЃХЉ ШїОю4 КЃРЬНК](https://ecimg.cafe24img.com/pg133b47913354030/droneman/web/upload/NNEditor/20231102/1a15e065f48b0b661d660705264b44ae.jpg)
![[ЦгФмМЅ] [CubePilot] ЧШНКШЃХЉ ШїОю4 КЃРЬНК](https://ecimg.cafe24img.com/pg133b47913354030/droneman/web/upload/NNEditor/20231102/de13eebb9de2b7dcf14cc9e9aadc4953.jpg)
CubePilotРЧ СІЧАРЮ Here 4 BaseДТ Ardupilot Йз PX4 НУНКХлАњ И№ЕЮ ШЃШЏЕЫДЯДй.
ЖЧЧб Mission Planner Йз QGroundControlРЛ ЦїЧдЧб СіЛѓ СІОю НКХзРЬМЧАњ ПјШАЧЯАд РЮХЭЦфРЬНКЕЫДЯДй.
RTK(Real-Time Kinematic) БтМњРЛ ЛчПыЧЯИщ ЧЅСи GNSS НУНКХлПЁ КёЧи Дѕ СЄШЎЧб РЇФЁ УпСЄРЬ АЁДЩЧеДЯДй. МОЦМЙЬХЭ МіСиРЧ СЄШЎЕЕПЁ ДыЧб РсРчЗТРК КёЧр СЄЙаЕЕИІ ХЉАд ЧтЛѓНУХЕДЯДй.
ЖЧЧб Here 4 BaseДТ ЛчПыРк ФЃШРћРИЗЮ МГАшЕЧОњНРДЯДй.
Mission PlannerПЭ ЧдВВ РлЕПЧЯЕЕЗЯ МГСЄЧЯДТ АЭРК УжМвЧбРЧ БИМКРЬ ЧЪПфЧб АЃДмЧб ЧСЗЮММНКРдДЯДй.
ЗЮЙіПЭ БтКЛ И№Ет АЃРЧ ЕЅРЬХЭ ХыНХРЛ РЇЧиМДТ Чб НжРЧ ПјАн УјСЄ И№ЕтРЬ ЧЪПфЧеДЯДй.
(РЬЗЏЧб И№Ет_ХкЗЙИоЦЎИЎ_РК ЧЅСи ЦаХАСіПЁ ЦїЧдЕЧОю РжСі ОЪНРДЯДй).
Pinout
![[ЦгФмМЅ] [CubePilot] ЧШНКШЃХЉ ШїОю4 КЃРЬНК](https://ecimg.cafe24img.com/pg133b47913354030/droneman/web/upload/NNEditor/20231102/dae37b74934099ab20738fa56a691121.jpg)
Operation instruction
1. Base/Rover Survey by Mission Planner
This part of the tutorial uses Mission Planner ground software and Arducopter-4.3.5 flight firmware for operating instructions.
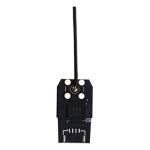
To use Here 4 Base on a UXV, you need the following hardwareЃК Computer, telemetry modules, Here4 Base , Base Antenna, Tripod.
![[ЦгФмМЅ] [CubePilot] ЧШНКШЃХЉ ШїОю4 КЃРЬНК](https://ecimg.cafe24img.com/pg133b47913354030/droneman/web/upload/NNEditor/20231102/83e24f21299a1017efd98ed104fddcad.jpg)
Before starting to use, please make sure that the hardware connection is correct:
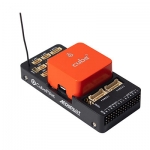
Ground side: Connect base antenna to base station, then connect the base station module to computer through USB port; Telemetry module is connected to another USB port of the same computer. UXV side: Connect Here 4 Base to CAN interface , telemetry module to the TELEM interface on flight control.
![[ЦгФмМЅ] [CubePilot] ЧШНКШЃХЉ ШїОю4 КЃРЬНК](https://ecimg.cafe24img.com/pg133b47913354030/droneman/web/upload/NNEditor/20231102/6f92bd96d02338d3f031ab6abd477b02.jpg)
Antenna Placing
Placing the RTK Antenna is very important for getting precise RTK positioning
Normal GPS positioning, only requires you to place the device near a window and it will provide you a GPS location over a period of time. But that's not enough for RTK. For the working environment of RTK, there are special requirements on antenna placement, which are much stricter than GPS.
The best environment for the base and rover antenna is a clear view of the sky that is 30 degrees above the horizon. RTK antenna can be elevated but ensure that there are no obstacles around, such as buildings, trees, cars, and etc
Example of a bad environment: indoors, urban areas, forests, or near the ground.
Example of a good environment: Open spaces, peak of a mountain, roof of a building.
Do not place the antenna near electronic devices, as high power electronic devices in close proximity may affect the radio frequency noise of the GPS signal. Examples are mobile phone base stations, high voltage transformers, etc.
Please place the base station in an outdoor environment with sufficient sky coverage to obtain a good satellite signal.
Place the base station on a stable and elevated platform, such as a tripod.
![[ЦгФмМЅ] [CubePilot] ЧШНКШЃХЉ ШїОю4 КЃРЬНК](https://ecimg.cafe24img.com/pg133b47913354030/droneman/web/upload/NNEditor/20231102/770c356c98d3d11004273db55a3df03d.jpg)

БтКЛСЄКИ
ЛѓЧАШФБт (1)
ЛѓЧАЙЎРЧ
ЦЧИХАЁАн
200,000Пј
ШИПјЧвРЮАЁАн
200,000Пј
РћИГБн
2,000Пј
ЛѓЧАЙјШЃ
QA84679
АќЗУЛѓЧА